

No products in the cart.
How to Install a Shade Net in Your Kitchen Garden A Step-by-Step DIY Guide
Urban and rural homeowners across Kenya are increasingly turning small spaces into productive kitchen gardens. With the right setup, you can grow vegetables, herbs, and even fruits right outside your home. However, one major challenge many gardeners face is excessive sunlight and unpredictable weather. This is where a shade net becomes a crucial tool for successful gardening.
Installing a shade net in your kitchen garden helps protect delicate crops from harsh sunlight, pests, wind, and heavy rain. It also creates a controlled environment that promotes healthy plant growth. In this detailed guide, we explain step-by-step how to install a shade net in your garden using durable materials from Cougar Nets, including shade nets and braided rope 10mm.
Understanding the Role of Shade Nets in Kitchen Gardening
Shade nets are woven or knitted polyethylene fabrics designed to filter sunlight and regulate temperature. They are measured by their percentage of shading, which represents how much sunlight they block.
Common shade net percentages include
-
50% Shade Net For vegetables and seedlings that require moderate sunlight
-
70% Shade Net Suitable for herbs and flowering plants that prefer less direct light
-
80% Shade Net Best for delicate crops and nurseries sensitive to heat
By controlling the amount of sunlight reaching your crops, a shade net ensures that plants receive enough light for photosynthesis without suffering from heat stress. It also keeps the garden cool, reducing water evaporation and maintaining soil moisture.
Cougar Nets offers a range of UV-stabilized options like the 80% GSM Shade Net that can last for several seasons even under Kenya’s intense sunlight.
Benefits of Installing a Shade Net in a Kitchen Garden
Using shade nets transforms the performance of a home garden in several ways
-
Protects from Harsh Sunlight The net reduces light intensity to prevent leaf burn and sun scalding
-
Improves Growth Conditions Creates a balanced microclimate with better humidity and temperature control
-
Reduces Pest and Bird Damage When combined with an anti-bird net or insect net, it helps block pests
-
Prevents Wind and Rain Damage Strong shade nets buffer against heavy winds and rainfall
-
Supports Climbing Plants When combined with a trellis net for climbing plants, vines grow easily and neatly
-
Enhances Aesthetic Appeal A neatly installed shade net creates a clean and organized look in the garden
Tools and Materials Needed for Installation
Before starting the installation, gather the following materials and tools
Main Materials
-
Shade Net (50% 70% or 80% depending on crops)
-
Braided Rope 10mm for securing the net
-
Support posts (wooden metal or PVC pipes)
-
Nails screws or cable ties
-
Anchors or ground pegs
-
Measuring tape and scissors
Optional Accessories
-
PVC coated chain link or poultry mesh for fencing the area
-
Plastic sheeting or tarpaulin if you want to reinforce the sides during the rainy season
Step-by-Step Guide to Installing a Shade Net
Follow this step-by-step process to install a durable shade net for your kitchen garden
Step 1 Plan the Layout
Start by measuring your garden area. Decide how much space you need to cover and whether you want a full enclosure or just an overhead canopy. Mark the corners using stakes or small posts.
If your garden is rectangular measure both the length and width to ensure you order the correct size of shade net from Cougar Nets.
Step 2 Choose the Right Shade Net Percentage
Different plants thrive under different light intensities.
-
50% Shade Net Suitable for kale spinach cabbage and onions
-
70% Shade Net Ideal for herbs tomatoes and lettuce
-
80% Shade Net Used for nurseries and delicate vegetables such as coriander
Select your shade net from the shade net collection according to your plant requirements and local climate.
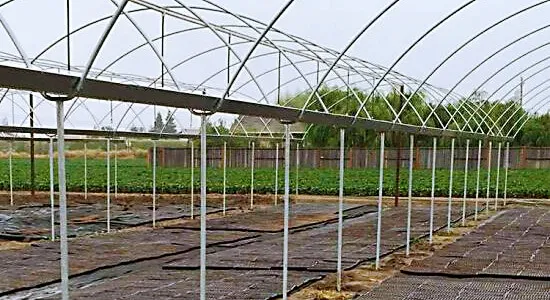
Step 3 Install the Support Structure
Install corner poles at each marked point. Use treated wooden poles or galvanized metal pipes for durability. The height of your structure depends on the crops being grown but a minimum of two meters is recommended to allow ventilation and easy access.
Fix the poles firmly into the ground with concrete or compacted soil for stability. Add intermediate poles along the longer sides for additional support.
Step 4 Attach the Frame Lines
Run braided rope 10mm horizontally from one pole to another to create a grid-like frame. The rope provides tension and support for the shade net to prevent sagging.
Tie the ropes tightly and evenly distribute the tension so the net will lay flat once installed.
Step 5 Fix the Shade Net
Drape the shade net evenly across the frame. Ensure that it covers the entire garden area with an extra allowance of at least 30 centimeters on each side for secure fastening.
Use the braided rope to tie the net to the support structure or frame lines. You can also use cable ties or clips for stronger attachment.
Pull the net gently but firmly to eliminate folds or slack. A well-stretched net lasts longer and performs better during strong winds.
Step 6 Secure the Edges
Once the net is in position secure the edges to the ground using anchors or pegs. This prevents the wind from lifting the sides. For added stability you can weigh down the edges with small stones or soil.
If you want partial coverage you may leave one side open for easy access to your plants.
Step 7 Reinforce and Inspect
Inspect the entire setup to ensure there are no loose ends or unfastened corners. Reinforce weak spots with additional rope or cable ties.
After installation monitor the performance of the net over the next few days. Check that sunlight is evenly distributed and no areas are overly shaded or exposed.
Tips for Maintaining a Shade Net in Your Kitchen Garden
-
Regular Cleaning Remove dust and debris from the net to maintain air and light penetration
-
Tighten the Rope Occasionally check the braided rope 10mm and tighten it to keep the net in good shape
-
Inspect for Damage Look for tears or frayed edges and repair them immediately
-
Proper Storage When not in use roll the net and store it in a dry shaded place
-
Avoid Sharp Tools Near the Net Keep sharp gardening equipment away from the material to prevent cuts
With proper maintenance a quality shade net can last five to ten years depending on usage and exposure.
Common Mistakes to Avoid During Installation
-
Using Weak Support Poles This can cause the structure to collapse during heavy rain or wind
-
Improper Tensioning Loose nets flap in the wind and wear out faster
-
Overstretching the Net Excess tension can tear the net during installation
-
Poor Drainage Planning Ensure rainwater can flow off instead of pooling on top
-
Using Inferior Quality Materials Always use genuine Cougar Nets products for long-lasting performance
Enhancing Your Kitchen Garden with Additional Netting Solutions
Shade nets can be complemented with other netting solutions from Cougar Nets to enhance protection and productivity
-
Insect Nets prevent small pests like whiteflies and aphids
-
Anti-Bird Nets protect fruiting plants from bird damage
-
PVC Coated Rabbit Mesh is perfect for small animal enclosures
-
PVC Coated Chain Link adds security around the garden perimeter
By combining these products, gardeners can create a complete and sustainable home food production system.
Cost Estimate and Budget Planning
The total cost of installing a shade net depends on the size of the area the type of net and the support materials used. A small kitchen garden can be covered with a modest budget while larger gardens may require professional assistance.
Cougar Nets provides affordable shade nets and braided ropes that guarantee durability and value for money. For larger installations such as greenhouse setups you can also consult our experts for bulk quotations and technical guidance.
Why Choose Cougar Nets for Your Garden Installation
Cougar Nets is Kenya’s trusted supplier of premium netting materials serving homeowners farmers and professionals across East Africa.
Our advantages include
-
High-quality UV-stabilized nets for long-lasting performance
-
Expert advice on installation and maintenance
-
Variety of net types for agriculture construction and aquaculture
-
Nationwide and regional delivery covering Kenya Tanzania Uganda Rwanda and beyond
We also stock complementary products like fish pond cover nets cargo netting and poultry mesh for versatile applications.
Conclusion
Installing a shade net in your kitchen garden is one of the most effective ways to improve crop health conserve water and increase yields. With simple tools and the right materials from Cougar Nets anyone can set up a protective canopy that keeps plants safe from excessive heat and weather damage.
By using strong braided ropes and durable shade nets, you ensure your garden remains productive throughout the year.
Get Your Premium Netting Solutions Today
For the best quality netting solutions for farming construction home or any other project look no further than Cougar Nets Our team of experts is ready to help you choose the perfect product for your needs
NATIONWIDE & EAST AFRICA DELIVERY AVAILABLE
✔ Premium quality nets for all applications
✔ Professional installation and expert advice
✔ Bulk orders and custom solutions available
✔ Serving Tanzania Rwanda Kenya Eldoret Nakuru South Sudan Ethiopia and beyond
Contact Us for a Quote
Cougar Nets
Email sales@cougarnets.com | info@cougarnets.com
Phone +254 706 903 465
Visit Us Darosa Plaza Karen Rd Nairobi
Website https://cougarnets.co.ke/